
Before you start
On an iPad, the apps and steps are the same as on the iPhone, give or take a few display details. On a Mac, the FuzeVPN extension for Chrome, Edge, Firefox or Brave protects only the browser; the file protects the whole Mac.
WireGuard: it is the simplest, and its file never expires. An OpenVPN file stays valid for the duration you chose when you created it, 90 days by default.
The menus quoted here are those of iOS 27 and macOS 27; they may be named differently on an older version.
- An active FuzeVPN subscription and a free device place among your 5 devices: each file counts as one device.
- An iPhone or iPad running iOS or iPadOS 15 or later, or a Mac running macOS 12 or later; some apps need a more recent version. To create a WireGuard file on the iPhone or iPad itself, use iOS or iPadOS 18.4 or later; on earlier versions, create it on a computer.
- The passcode of the iPhone or iPad, or the administrator password of the Mac: the system may ask for it to allow the VPN configuration.
Choose the app
The simplest option on iPhone, iPad and Mac: the official WireGuard app, which is free, with a WireGuard file. For an iPhone or iPad running iOS or iPadOS earlier than 18.4, create the file on a computer: from a Windows PC, use an OpenVPN file and OpenVPN Connect, with the USB transfer described below; from a Mac, transfer a WireGuard file by AirDrop or iCloud Drive.
For an OpenVPN file: OpenVPN Connect on iPhone and iPad; on Mac, Tunnelblick, which is free, or OpenVPN Connect.
| App | Devices | FuzeVPN file |
|---|---|---|
| WireGuard | iPhone, iPad and Mac | WireGuard (.conf) |
| OpenVPN Connect | iPhone, iPad and Mac | OpenVPN (.ovpn) |
| Tunnelblick | Mac | OpenVPN (.ovpn) |
| Passepartout | iPhone, iPad and Mac | WireGuard (.conf) / OpenVPN (.ovpn) |
| Viscosity | Mac | OpenVPN (.ovpn) |
- Price: WireGuard, OpenVPN Connect and Tunnelblick are free; Passepartout is free, with paid options; Viscosity costs 16 USD as a one-time purchase, after a free 30-day trial.
- Language: WireGuard, Tunnelblick and Passepartout follow the language of your device, and Viscosity is translated too; OpenVPN Connect is in English on iPhone and iPad. This guide quotes the English labels, which may appear translated in the apps.
- Minimum system: iOS or iPadOS 15 for WireGuard and OpenVPN Connect, 17 for Passepartout; macOS 12 for WireGuard and OpenVPN Connect, 13 for Tunnelblick, 14 for Passepartout and Viscosity.
- Where to download them: WireGuard and Passepartout, from the App Store and the Mac App Store; OpenVPN Connect, from the App Store for iPhone and iPad. On a Mac, OpenVPN Connect, Tunnelblick and Viscosity are downloaded from their publisher’s website.
- Publisher shown on the App Store, to check before you install: WireGuard Development Team for WireGuard, OpenVPN Inc. for OpenVPN Connect, Algoritmico Ltd for Passepartout. Tunnelblick is published by the Tunnelblick project, Viscosity by SparkLabs.
- Source code: open for WireGuard (MIT license), Passepartout (GPLv3 license) and Tunnelblick (GPL-2.0 license); OpenVPN Connect is built on the open OpenVPN 3 engine; Viscosity is proprietary.
Sources and references
- App Store — WireGuard for iPhone and iPad (opens an external website)
- App Store — OpenVPN Connect (opens an external website)
- App Store — Passepartout, VPN Client (opens an external website)
- Mac App Store — WireGuard (opens an external website)
- Tunnelblick — Downloads (opens an external website)
- OpenVPN — OpenVPN Connect for macOS (opens an external website)
- Passepartout — Official website (opens an external website)
- SparkLabs — Download Viscosity (opens an external website)
Create the file in your customer area
The simplest way is to create the WireGuard file directly on the device you want to set up: in Safari on an iPhone or iPad running iOS or iPadOS 18.4 or later, or in your browser on a Mac. If you create it on another device, you will have to transfer it, or regenerate the configuration from the iPhone: the next section explains how.
Open the Devices section
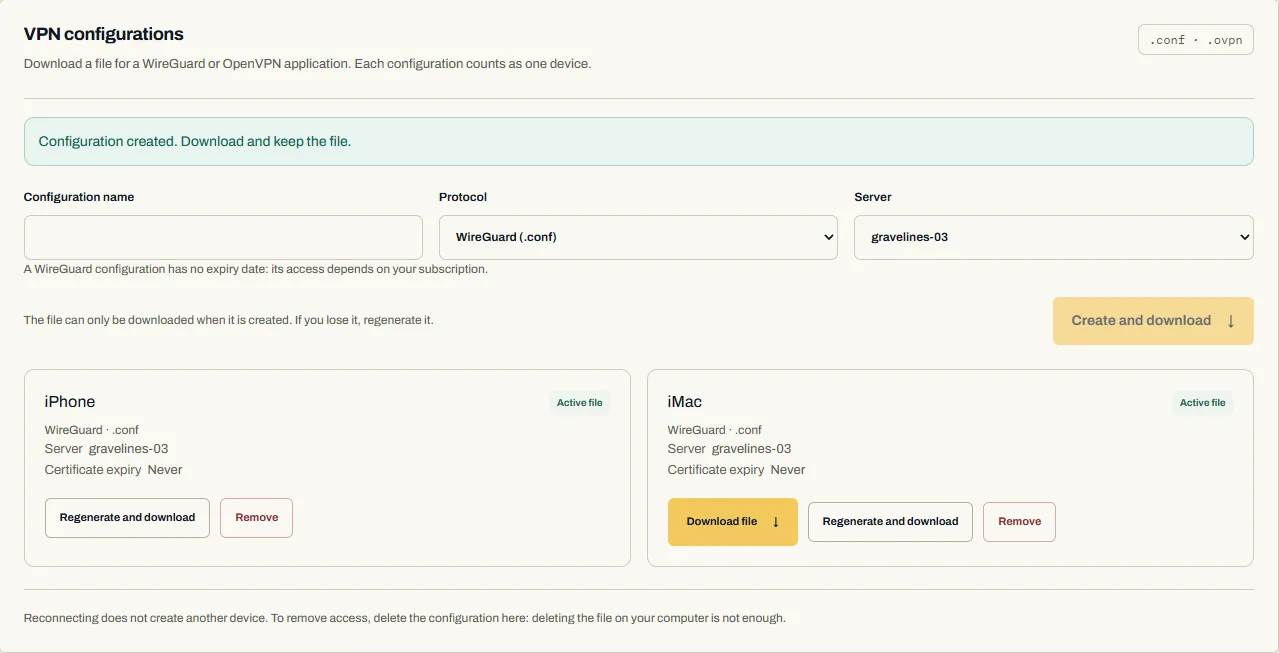
Sign in to your customer area, open the Devices section, then scroll down to the block of VPN configurations. The “Go to my account” button is at the bottom of this page.
Name the configuration
Give it the name of the device, for example iPhone or iMac. This name only helps you recognize it in your customer area; it does not appear in the file name.
Choose the protocol
Choose WireGuard (.conf file), the simplest and fastest, or OpenVPN (.ovpn file).
Choose the server
The server name starts with the city name in English, followed by the server number: gravelines-03, for example, is in Gravelines, France. The file will always connect there; for another location, you will need another file. For the best speed, choose a location close to you.
Duration (OpenVPN)
For an OpenVPN file, enter its duration from 1 to 99,999 days, 90 by default. A WireGuard file does not expire: its access depends on your subscription.
Create and download
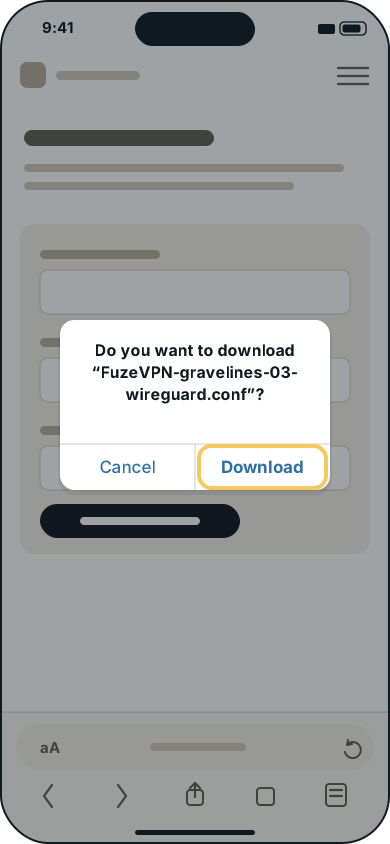
Tap or click “Create and download”, then stay on the page: the file downloads as soon as the configuration is ready. If Safari asks you to confirm the download, accept.
Keep the file
As long as you stay on the page, the card of the last configuration created lets you download the file again. After that, only a regeneration gives you a new one. Downloading or regenerating the same configuration does not use an extra device place.
Get the file onto the iPhone or iPad
When your file is in the Files app, the VPN app’s import button opens it, and you find the file there, using search if needed. To get the file onto the iPhone or iPad, choose one of the methods below.

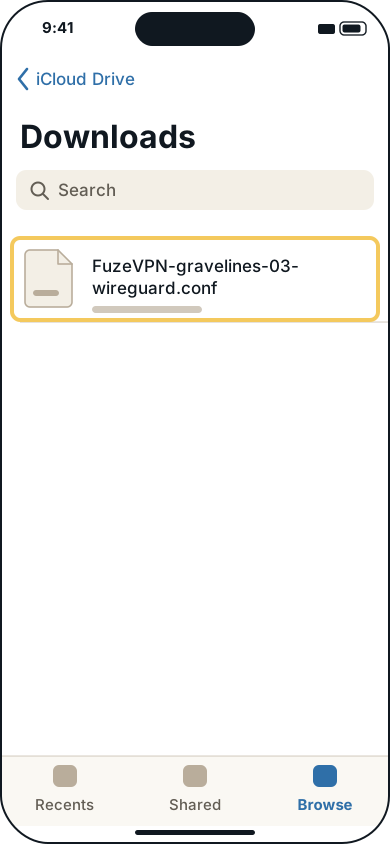
- The simplest, on iOS or iPadOS 18.4 or later: create the WireGuard file on the iPhone or iPad itself, in Safari. It is saved by default in iCloud Drive, in the Downloads folder: tap Safari’s Downloads button, next to the search field, or open the Files app → Browse → iCloud Drive → Downloads. On an iPad, iCloud Drive is in the sidebar of the Files app.
- From the Mac, with AirDrop: in the Finder, select the file, click the Share button in the toolbar, then AirDrop, and choose your iPhone. Transfers are encrypted; between devices signed in to the same Apple Account, the file is accepted automatically, otherwise tap “Accept” on the iPhone. You then find it in the Files app, using search if needed.
- WireGuard file already created on a PC or an Android phone: on the iPhone or iPad, running iOS or iPadOS 18.4 or later, open the Devices section and regenerate that configuration. The new file downloads onto the device, without using an extra device place, and the old one stops working.
- Through iCloud Drive: on the Mac, put the file in iCloud Drive; it appears on the iPhone in the Files app → iCloud Drive.
- By cable, for OpenVPN Connect: on the iPhone or iPad, download OpenVPN Connect from the App Store, then open the app. In the Mac’s Finder, select the iPhone, open the Files tab, then drag the .ovpn file onto OpenVPN. The app then offers it for import. From Windows: connect the iPhone or iPad by USB and open iTunes. Click the device button → “File Sharing”, select OpenVPN, click “Add”, choose the .ovpn file, then click “Add”. On the iPhone or iPad, open OpenVPN Connect, tap “Add” → “File”, select the transferred profile, then tap “Add”.
Sources and references
- Apple — Find downloads on your iPhone or iPad (opens an external website)
- Apple — Use AirDrop to send items to nearby Apple devices (opens an external website)
- Apple — Delete files or recover deleted files in the Files app on your iPhone or iPad (opens an external website)
- Apple — iCloud data security overview (opens an external website)
- OpenVPN — Transfer the .ovpn file to iOS (opens an external website)
iPhone and iPad: import into WireGuard
In WireGuard, each imported file becomes a tunnel: this is the VPN connection to the location of the file.
Install WireGuard
Download WireGuard from the App Store, making sure the publisher is WireGuard Development Team. The app is free.
Add a tunnel
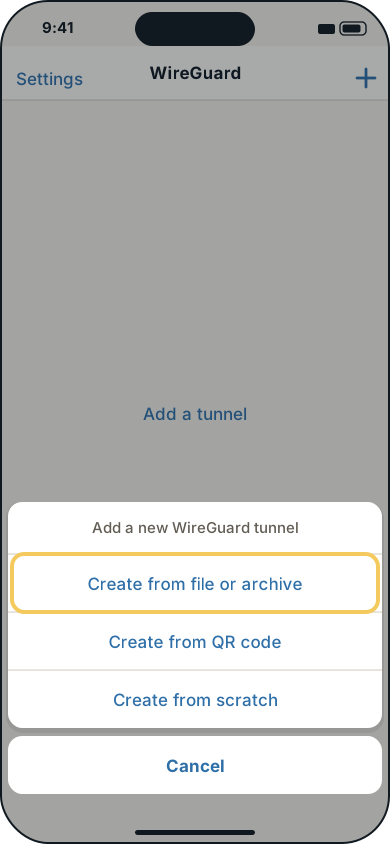
Open WireGuard and tap “Add a tunnel”, or “+” at the top of the screen, then “Create from file or archive”.
Choose the file
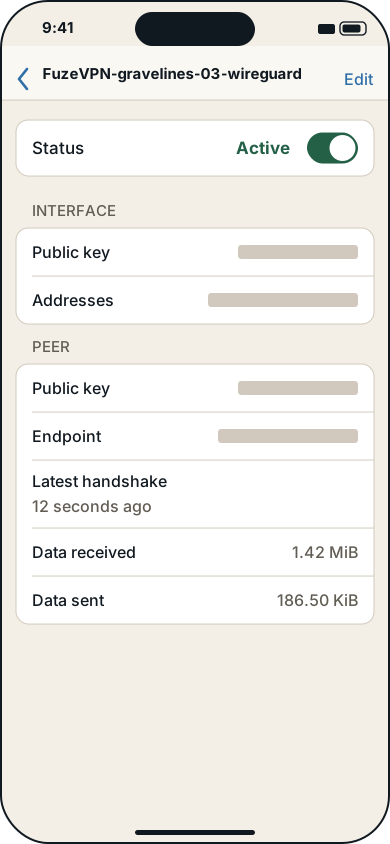
Tap the .conf file in the Files app, usually in iCloud Drive → Downloads. The tunnel takes the name of the file, for example FuzeVPN-gravelines-03-wireguard, not the name you gave in the customer area.
Allow the VPN configuration
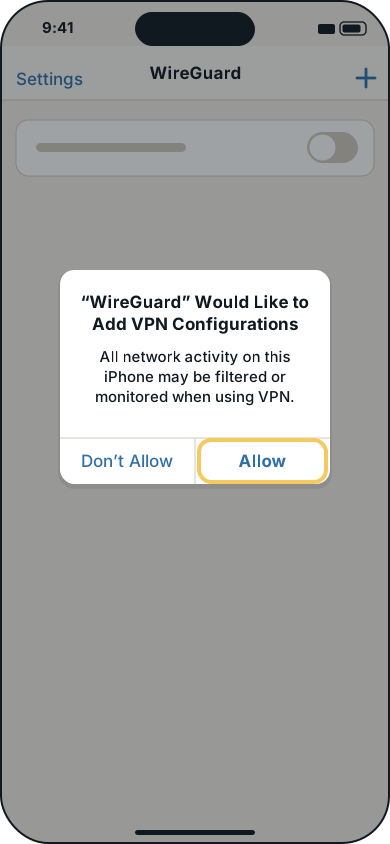
iOS asks you to allow WireGuard to add VPN configurations; this message appears for every VPN app. Tap “Allow”, then enter the device passcode if asked.
Turn the tunnel on
Tap the switch next to the tunnel name to turn it on.
Check the link
Tap the tunnel name: “Status” should say “Active”, “Latest handshake” should show a recent time, and “Data received” should keep increasing.
- To turn the VPN off, tap the switch again.
iPhone and iPad: import into OpenVPN Connect
The “Choose the file” step below is for a .ovpn file in the Files app. For a file transferred by cable into OpenVPN, use the cable instructions above for that step, then continue with the remaining steps below.
Install OpenVPN Connect
Download OpenVPN Connect from the App Store, then open the app. On first launch, read and accept its data usage policy.
Choose the file
On the import screen, tap the “Upload File” tab, then choose the .ovpn file in the Files app.
Check the profile
The “Imported Profile” screen shows the profile name, which you can change in “Profile Name”. No username is needed: the file contains the certificate and the key. Select “Connect after import”, then confirm: the connection starts.
Allow the VPN configuration
If iOS asks, allow OpenVPN Connect to add VPN configurations, then enter the device passcode.
Check the connection
“CONNECTED” should appear, and the counters under “CONNECTION STATS” should be moving. If not, turn on the profile switch.
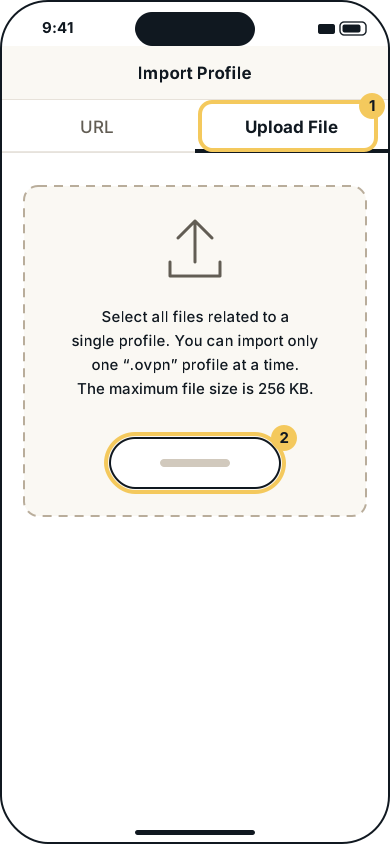
- To import another file later: “menu → My Profiles → add icon → Upload File”, then choose the .ovpn file.
- Because it asks for no username, the FuzeVPN profile can also be connected from the iOS settings, without opening the app.
- In the app’s settings, leave “VPN Protocol” on “Adaptive” or “UDP”: FuzeVPN files connect over UDP, never TCP.
- After an app update, if the connection gives you trouble, delete the profile, regenerate the file in the Devices section, without an extra device place, then import it.
iPhone and iPad: import into Passepartout
Passepartout imports both WireGuard (.conf) and OpenVPN (.ovpn) files.
Install Passepartout
Download “Passepartout, VPN Client” from the App Store.
Import the file
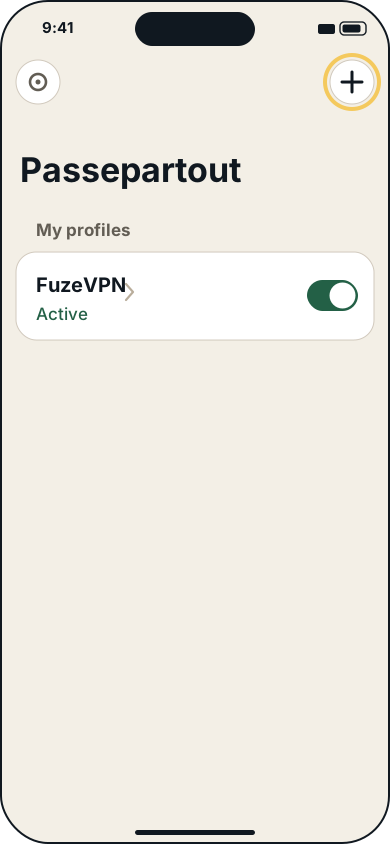
Tap “+”, then “Import file”, and choose the .conf / .ovpn file in the Files app.
Start the connection
In “My profiles”, tap the profile to connect it, and allow the VPN configuration to be added if iOS asks. Its status changes to “Active”.
Sources and references
Mac: import into WireGuard
Install WireGuard
Download WireGuard from the Mac App Store, then open the app. Its icon appears in the menu bar, at the top of the screen.
Import the file
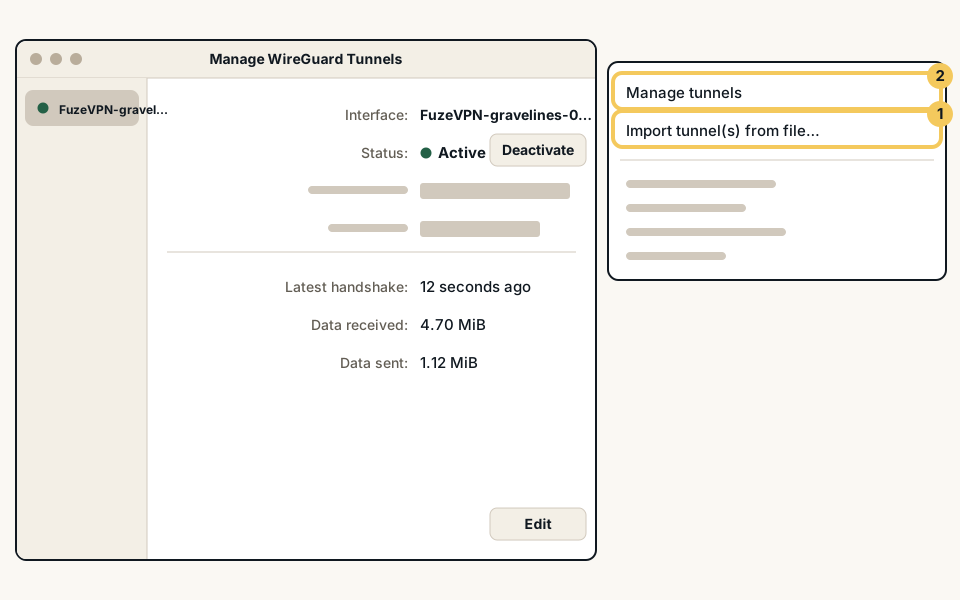
Click the WireGuard icon in the menu bar, then “Import tunnel(s) from file…”. Choose the .conf file, by default in the Downloads folder, then click “Import”.
Allow the VPN configuration
If macOS asks you to allow a VPN configuration to be added, allow it.
Turn the tunnel on
In the same menu, click “Manage tunnels”: the “Manage WireGuard Tunnels” window opens. Select the tunnel, then click “Activate”: its status changes to “Active”, and “Latest handshake” shows a recent time.
- Closing the window does not turn the VPN off: if WireGuard offers “Close Tunnels Manager” or “Quit WireGuard”, choose the first. “Quit WireGuard”, in the icon menu, leaves the tunnel active, but the app will no longer reopen when you log in.
- WireGuard imports .conf files and .zip archives.
- Before an update through the Mac App Store, WireGuard asks you to turn the tunnel off; turn it back on afterwards.
Mac: import into Tunnelblick
Tunnelblick reads the OpenVPN file (.ovpn). The WireGuard file is imported into WireGuard or Passepartout.
Download Tunnelblick
On the Tunnelblick website, download the latest stable version, open the .dmg file, then double-click Tunnelblick.
Allow it to open
If macOS asks you to confirm opening an app downloaded from the Internet, confirm. If it blocks the app, open “System Settings → Privacy & Security”, then click “Open Anyway”.
Install Tunnelblick
Tunnelblick offers to check for updates, which we recommend, and for IP address changes: both checks contact its website. Then enter the administrator password.
Add the file
On first launch, choose “I have configuration files”. Then drag the .ovpn file onto the Tunnelblick icon in the menu bar.
Confirm the installation
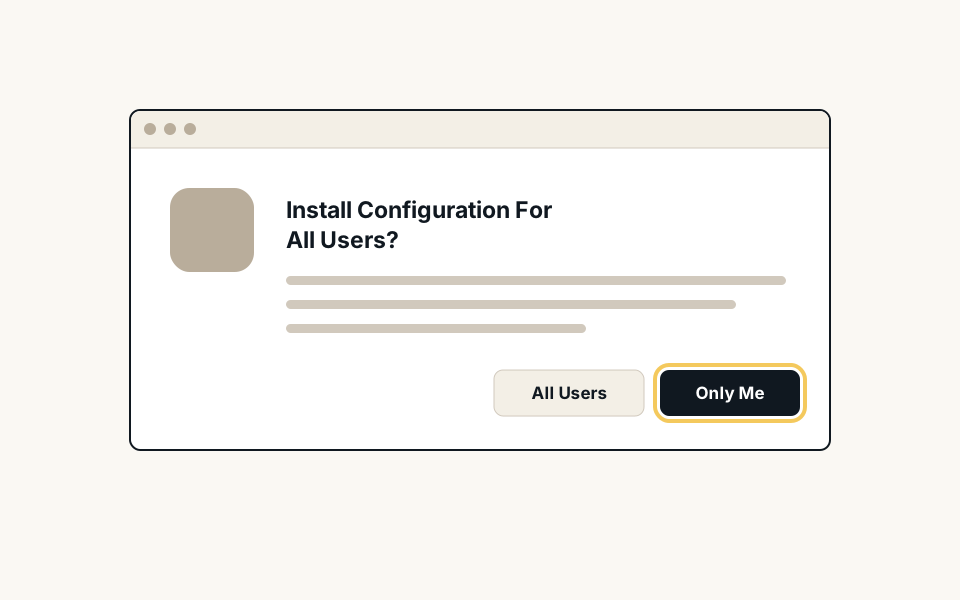
When asked “Install Configuration For All Users?”, choose to install it for yourself only (“Only Me”), unless other accounts on the Mac need to use it. Then enter the administrator password.
Start the connection
Click the Tunnelblick icon, then “Connect” followed by the name of the configuration. Then follow “Check that everything goes through FuzeVPN” below. To turn it off, choose “Disconnect” in the same place.
- The administrator password is requested for every configuration you add: this is normal, it is how Tunnelblick protects its configurations.
- Keep Tunnelblick up to date: its recent versions fixed a flaw that could stop the VPN’s DNS servers from being used.
Mac: import into OpenVPN Connect
OpenVPN Connect for Mac is downloaded from the OpenVPN website, not from the Mac App Store. The labels quoted are those of the OpenVPN documentation.
Download the installer
Open the Apple menu → About This Mac: a “Chip” line means an Apple silicon Mac, a “Processor” line an Intel Mac. Then, on the macOS page of the OpenVPN website, choose “Download for Apple Silicon” or “Download for Intel Mac”.
Install the app
Open the downloaded .pkg file: the installer opens. Accept the license, enter the administrator password, then move the installer to the Trash.
Allow the network extension
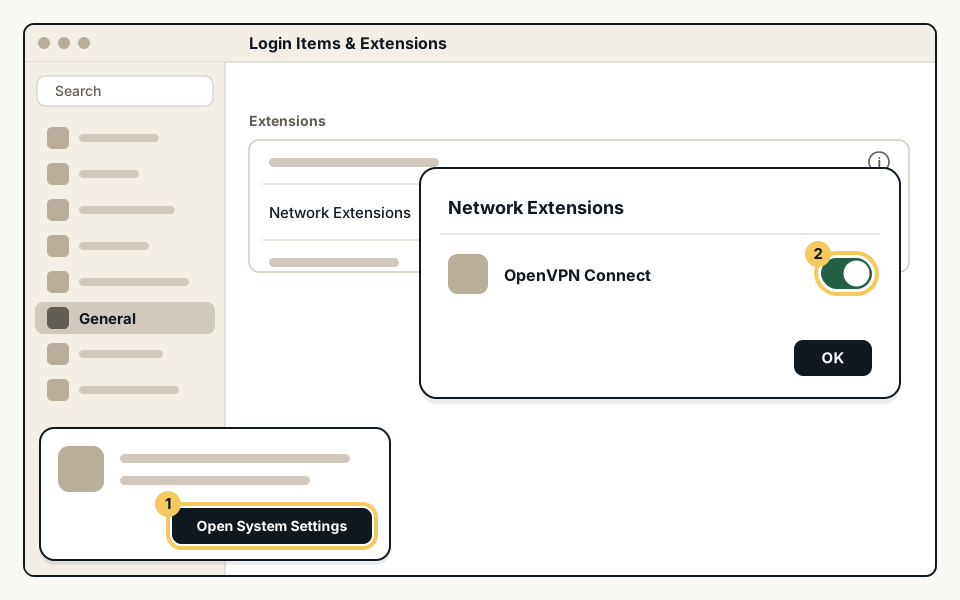
Since version 3.9, OpenVPN Connect asks, on first launch, to enable its network extension. Choose “Open System Settings”, allow the extension with an administrator account, then approve the VPN configuration: this authorization is only asked for once.
Import the file
Drag the .ovpn file onto the OpenVPN Connect window, or double-click it, then confirm the import.
Start the connection
Click “Connect” or turn on the profile switch, depending on the version. On newer versions of macOS, the profile also appears in “System Settings → VPN”, from where you can connect it without opening the app. Then follow “Check that everything goes through FuzeVPN” below.
- Keep the app up to date: its recent updates fixed security flaws and routing problems.
Mac: use Passepartout or Viscosity
From the Mac App Store, Passepartout works as on iPhone, from macOS 14: “+”, then “Import file”, with a WireGuard or OpenVPN file. The version offered outside the App Store, on the publisher’s website or on GitHub, is limited to the free features. Place it in the Applications folder, then, on macOS 15 or later, enable it in “System Settings → General → Login Items & Extensions → Network Extensions”.
Viscosity, by SparkLabs, costs 16 USD as a one-time purchase, after a free 30-day trial, and only imports OpenVPN files. The labels below are those of its documentation, in English; on a Mac set to another language, they may appear translated.
Install Viscosity
Download Viscosity from the SparkLabs website, open the .dmg file and drag the app into Applications. On first launch, enter the name and password of an administrator.
Import the file
Double-click the .ovpn file to import it. Otherwise, click the Viscosity icon in the menu bar, then “Settings… → Connections → + → Import Connection → From File…”, and choose the file.
Start the connection
Choose the connection in the Viscosity menu, in the menu bar. Then follow “Check that everything goes through FuzeVPN” below.
- Viscosity has no built-in blocking of traffic outside the VPN.
- SparkLabs advises temporarily turning off iCloud Private Relay while you use Viscosity: it can cause the VPN’s DNS servers to be ignored.
Sources and references
Check that everything goes through FuzeVPN
Check the app
WireGuard should show “Active” and a recent “Latest handshake”; Passepartout, “Active”; OpenVPN Connect, “CONNECTED”; Viscosity, “Connected” in its “Details” window, opened from the menu bar icon. In Tunnelblick, the option “Check if the apparent public IP address changed after connecting” does this check for you, by contacting its website.
Check the IP address
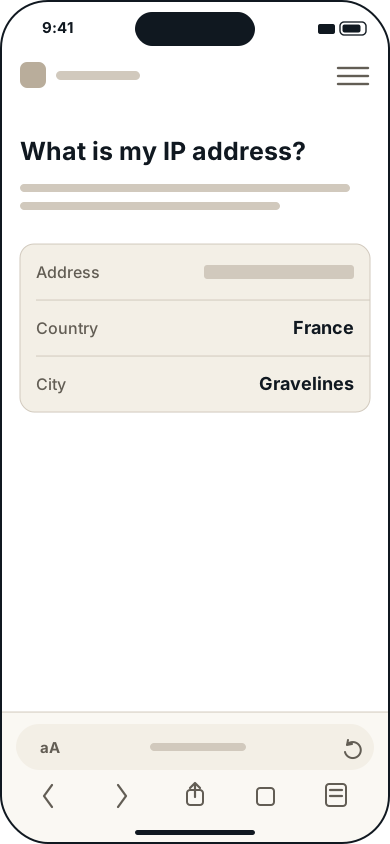
With the VPN connected, open our “What is my IP address?” tool: it should show the location of your file, not your internet provider or your mobile carrier.
Test WebRTC
WebRTC, the technology behind audio and video calls in the browser, can reveal your address. Run our “WebRTC leak test”: the non-relay public addresses shown should be those of your FuzeVPN location. A private address, for example 192.168.x.x, or a relay’s address is not your public address.
Check the DNS
Open the Cloudflare diagnostic page listed in the sources: “Connected to 1.1.1.1” should show “Yes”. On a Mac, if your browser uses its own secure DNS, turn it off during the test. If you get “No”, update the app or try WireGuard; with Viscosity, turn off iCloud Private Relay for a while. After the test, restore your browser’s secure DNS setting if you changed it.
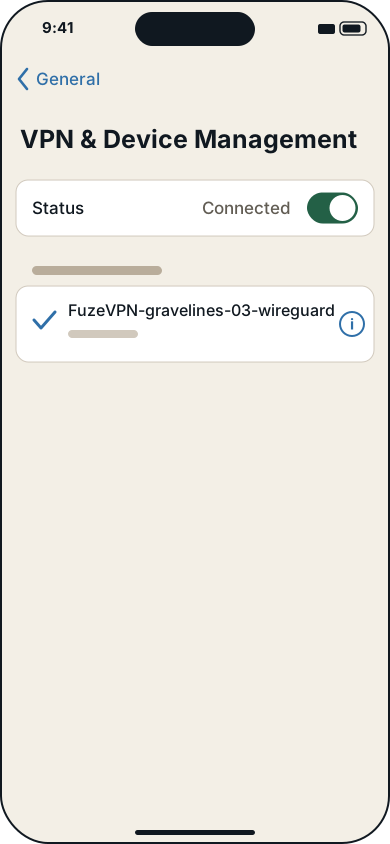
Turn the VPN on or off in Settings
On iPhone and iPad, “Settings → General → VPN & Device Management” lists the VPN configurations of your apps: you can connect or disconnect FuzeVPN there, or remove it from the device. This does not free its device place: only deleting its configuration in the Devices section does. To find these settings quickly, type VPN in the Settings search.
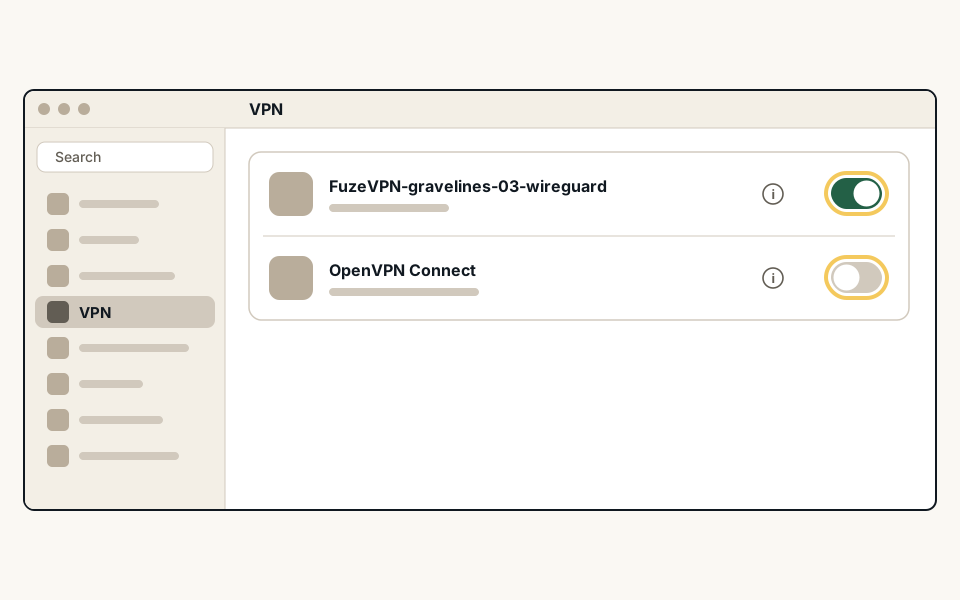
On macOS 12, use the WireGuard app as described in “Mac: import into WireGuard” above. On newer versions of macOS, “System Settings → VPN”, in the sidebar, lists the VPN services, each with its own switch. OpenVPN Connect profiles appear there since version 3.9; Tunnelblick and Viscosity are controlled from their icon in the menu bar.
For quick access on newer versions of macOS, add the VPN menu: “System Settings → Menu Bar”, then turn on VPN. On macOS 13 to 15, go through “System Settings → Control Center”, then choose “Show in Menu Bar” next to VPN. This menu can also show the connection time.
Sources and references
- Apple — Set up a VPN on iPhone and iPad (opens an external website)
- Apple — Check whether a VPN or other third-party security software is turned on (opens an external website)
- Apple — Change VPN settings on Mac (opens an external website)
- Apple — Use the VPN status menu in the menu bar on Mac (opens an external website)
- Apple — Use the VPN status menu in the menu bar on Mac (macOS 15) (opens an external website)
Automatic connection and blocking outside the VPN
To stay protected without thinking about it: on-demand activation in WireGuard, “Seamless Tunnel” in OpenVPN Connect, connecting at launch in Tunnelblick. The other options depend on how you use your device.
| App | Automatic connection | Blocking outside the VPN |
|---|---|---|
| WireGuard (iPhone, iPad) | “On-Demand Activation” | No setting |
| WireGuard (Mac) | “On-Demand:” | No setting |
| OpenVPN Connect | On Mac: open the OpenVPN Connect menu → “Settings”, then under “Launch Option” choose “Connect latest”. Restart the Mac and check that the VPN reconnects. On iPhone and iPad, connect the imported OpenVPN profile in the app. For automatic connection, use WireGuard’s “On-Demand Activation”. | “Seamless Tunnel” |
| Passepartout | “On-demand rules” (paid): open your profile, select “On-demand” under “Modules”, choose the networks, return to the profile, turn on the module, then select “Save”. | “Force tunnel”, with caution |
| Tunnelblick | “When Tunnelblick launches” | “Disable network access” |
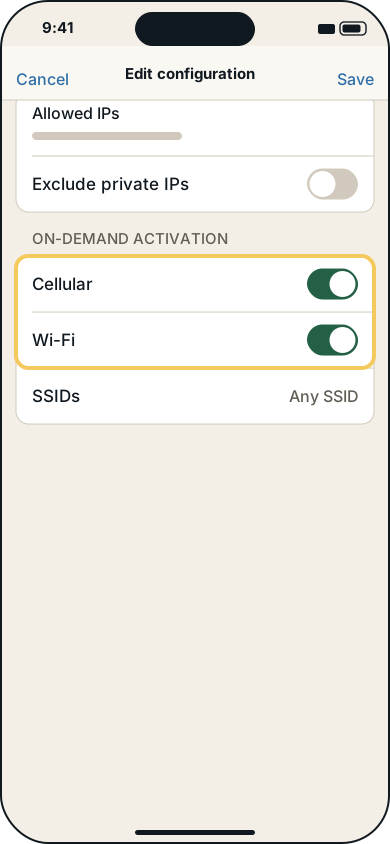
- WireGuard on iPhone or iPad: tap the tunnel, then “Edit”. Under “On-Demand Activation”, turn on “Cellular”, “Wi-Fi” or both. For Wi-Fi, “Except these SSIDs” leaves out the networks of your choice, identified by their name (SSID), your internet box’s for example. Tap “Save”.
- WireGuard on Mac: in “Manage WireGuard Tunnels”, select the tunnel, click “Edit”, check “Ethernet” or “Wi-Fi” on the “On-Demand:” line, then click “Save”.
- “Exclude private IPs”, on the same screen, keeps the addresses of your local network outside the tunnel: a printer, a network drive (NAS) or AirPlay remain reachable while you are connected.
- OpenVPN Connect: “Seamless Tunnel”, in the app’s settings, blocks the Internet while the VPN is paused or reconnecting. “Connect Via” chooses the networks the VPN can connect on.
- Tunnelblick, automatic connection: in its menu, “VPN Details… → Configurations → Settings” tab, set “Connect:” to “When Tunnelblick launches”. Tunnelblick relaunches at login if it was open when you shut down the Mac or logged out.
- Tunnelblick, blocking: in the same place, set “On unexpected disconnect:” to “Disable network access”. If the VPN drops, the whole network is cut, local network included, even after a restart, until you turn it back on from the Tunnelblick menu. This blocking does not apply if Tunnelblick is quit.
- Passepartout: according to the publisher, “Force tunnel” tries to send most of the traffic through the tunnel, at the risk of degrading connectivity.
Change location
A file always connects to the same location. To change it, create a new file. Each file counts as one device.
Free up a place
If all your device places are taken, disconnect the old tunnel or profile and check that the internet works without the VPN. Then delete the old configuration in the Devices section. It is this deletion that frees its device place, not the removal of the tunnel on the device.
Create the new file
Create a configuration for the new location, as you did the first time.
Import the file
Import the new file into the same app. In OpenVPN Connect on iPhone or iPad, go through “menu → My Profiles → add icon → Upload File” to choose a .ovpn file from the Files app. For a file transferred by cable into OpenVPN, follow the cable instructions above. On Mac, drag the .ovpn file onto the OpenVPN Connect window, or double-click it, then confirm the import. In WireGuard for Mac, use the menu of its icon. Then turn on the tunnel or profile and check that your VPN client shows the connection as active.
Tidy up
If you kept the old configuration, delete it in the Devices section now. Delete the old tunnel or profile from the app: once its configuration is deleted, it no longer connects.
- You can also keep several locations, one file each, if your device places allow it. WireGuard and OpenVPN Connect only connect one at a time: turning on a tunnel turns off the previous one.
- Tunnelblick can connect several configurations at once: connect only one, especially since its blocking on disconnect does not suit several connected VPNs.
Replace a file or free up its place
Connecting and disconnecting, as often as you like, does not create a device. FuzeVPN does not keep your private key: it cannot send you a lost file, but you can regenerate it, without an extra device place. To regenerate a configuration, click “Regenerate and download”, then “Replace the old file?”. To remove it, click “Remove”, then “Confirm removal”.
| Situation | What to do | Device places |
|---|---|---|
| File lost before import | If its configuration’s card still shows “Download file”, click it. Otherwise, regenerate it in the Devices section: the old file stops working. | Unchanged |
| Regenerated file, to import into WireGuard | First delete the old tunnel, which has the same name, then import the new file and connect again. | Unchanged |
| Expired OpenVPN file | Regenerate it, choosing its duration again; in your VPN client, delete the old profile, then import the new file and connect again. | Unchanged: an expired file keeps its device place as long as its configuration exists |
| Subscription interrupted then resumed | Nothing to do: the file works again as soon as you resubscribe; an OpenVPN file that expired in the meantime must be regenerated: delete the old profile in your VPN client, then import the new file and connect again. | Unchanged |
| Device lost, sold or unused | Delete its configuration in the Devices section: its device place is freed immediately, and its access revoked. Erasing the file, deleting the tunnel or uninstalling the app is not enough. | One place freed |
- Delete a WireGuard tunnel on iPhone or iPad: tap the tunnel, then “Edit” and “Delete tunnel”.
- On a Mac: select it in “Manage WireGuard Tunnels”, click the “−” button under the list, then confirm with “Delete”.
iPhone and Mac specifics
- One tunnel at a time: on iPhone, iPad and Mac, WireGuard, OpenVPN Connect and Passepartout use the same Apple mechanism. Only one of their configurations can be active: turning on another turns off the first. Other VPNs, such as Tunnelblick on Mac, can stay connected in parallel: keep only one active.
- Extension and file on a Mac: each takes up a device place. The file already protects the whole Mac. Keep the extension only as a backup for the browser, for example on a hotel or corporate network where the file does not connect.
- iCloud Private Relay: traffic that goes through the VPN does not use Private Relay. So there is nothing to turn off for FuzeVPN, except with Viscosity, as SparkLabs advises. On a Mac, the message “Some of your system settings prevent iCloud Private Relay from working properly” can appear because of the settings or extensions of an installed VPN app.
- “Limit IP Address Tracking”: this setting of each Wi-Fi or cellular network is tied to iCloud Private Relay. You do not need to change it for FuzeVPN.
- Hotel or station Wi-Fi: if the network’s login page does not appear, turn off the tunnel and its on-demand activation. Sign in on the page, then turn the tunnel back on. In WireGuard, “Except these SSIDs” can exclude this network from on-demand activation; OpenVPN Connect offers “Captive Portal Detection”.
- Personal Hotspot: do not count on the iPhone’s VPN to protect devices connected to its Personal Hotspot. Install FuzeVPN on each of them, or go through a router set up with FuzeVPN.
- System traffic: whatever the VPN, Apple always leaves a few technical exchanges outside the tunnel. For example: obtaining an address on the local network, the login page of a public Wi-Fi, the mobile carrier’s VoLTE calls and exchanges with an Apple Watch.
Sources and references
- Apple Developer — NETunnelProviderManager (opens an external website)
- Apple Developer — NEVPNProtocol.includeAllNetworks (opens an external website)
- Apple — iCloud Private Relay overview (PDF) (opens an external website)
- Apple — Manage iCloud Private Relay for websites, networks or system settings (opens an external website)
Troubleshooting
| What you see | Solution |
|---|---|
| The customer area does not create the file | The browser is too old to create the key. For a WireGuard file on iPhone and iPad, use iOS or iPadOS 18.4 or later. Update the device or the browser, or create the file on a computer, then transfer it. |
| The customer area refuses a new configuration | Your 5 device places are taken, your subscription is inactive or the server is temporarily full. Delete a configuration or remove a device you no longer use, check your subscription or choose another server. |
| A configuration stays in preparation | The page was left before the download, and the key, created in the browser, is lost. Delete this configuration in the Devices section, then create a new one, staying on the page until the download. |
| iPhone: file not found | In the Files app, on the Browse tab, search for FuzeVPN. If the download failed, click “Download file” if it is still offered on the configuration’s card in the Devices section; otherwise, regenerate the file there, without an extra device place. |
| Mac: the file is greyed out in WireGuard | Its name ends in .conf.txt, and WireGuard for Mac only accepts .conf and .zip. Show the extensions (“Finder → Settings → Advanced → Show all filename extensions”), then remove .txt from the name. |
| iPhone: the file ends in .txt | WireGuard imports it anyway. For OpenVPN Connect, rename it to .ovpn in the Files app: touch and hold the file, then “Rename”. |
| “A tunnel with that name already exists” | File already imported: use the existing tunnel. Regenerated file, which has the same name as the old one: delete the old tunnel in WireGuard, then import the new file. |
| “Unable to import tunnel” | Wrong file, an .ovpn in WireGuard for example, or damaged file. Import the .conf into WireGuard or Passepartout, the .ovpn into an OpenVPN app; if needed, regenerate the file. |
| WireGuard: no “Latest handshake” | First check that the device’s time is correct, especially if it went backwards since the last connection. iPhone: “Settings → General → Date & Time → Set Automatically”. Mac: “System Settings → General → Date & Time”, automatic setting. If there is still no handshake, try another network, then check your subscription and configuration in the customer area as explained in the next two rows. |
| No connection on hotel, corporate or public Wi-Fi | FuzeVPN files use UDP. First try a file with the other protocol or another location, using the replacement steps in the “WireGuard and OpenVPN files” guide linked below. If it still does not connect, try the cellular network or another Wi-Fi. On a Mac, the FuzeVPN extension, which goes through port 443 like secure websites, can protect your browsing in the meantime. |
| No connection, on any network | Check in the customer area that your subscription is active and that the configuration still exists; if needed, regenerate it, delete the old tunnel or profile in your VPN client, then import the new file and connect again. If its server was removed, create a file for another server using the replacement steps in the “WireGuard and OpenVPN files” guide linked below. |
| The OpenVPN file no longer connects | Look at its expiry date on the configuration, in the Devices section. If it has passed, regenerate the file, delete the old profile, then import the new one and connect again. |
| Another VPN turns off, or FuzeVPN refuses to turn on | WireGuard, OpenVPN Connect and Passepartout only have one active tunnel at a time; a work or school profile, or a filtering or parental control app, can also take over. Keep only one VPN active and check “Settings → General → VPN & Device Management” (iPhone), or “System Settings → VPN” and “System Settings → General → Device Management” (newer versions of macOS). |
| Connected, but no page opens | Often, the Wi-Fi login page has not been completed: turn off the VPN, complete it, then turn the VPN back on. On a Mac, also update Tunnelblick; with Viscosity, turn off iCloud Private Relay for a while. |
| Cannot turn off the VPN in Settings | On-demand activation turns it back on: turn off the tunnel in WireGuard, whose switch also turns off the on-demand rule. |
| Mac: OpenVPN Connect no longer connects since version 3.9 | Its network extension is not yet allowed: open the app, choose “Open System Settings” and allow the extension. |
| Mac: Passepartout installed outside the App Store stays inactive | Place it in the Applications folder, then, on macOS 15 or later, enable it in “System Settings → General → Login Items & Extensions → Network Extensions”. |
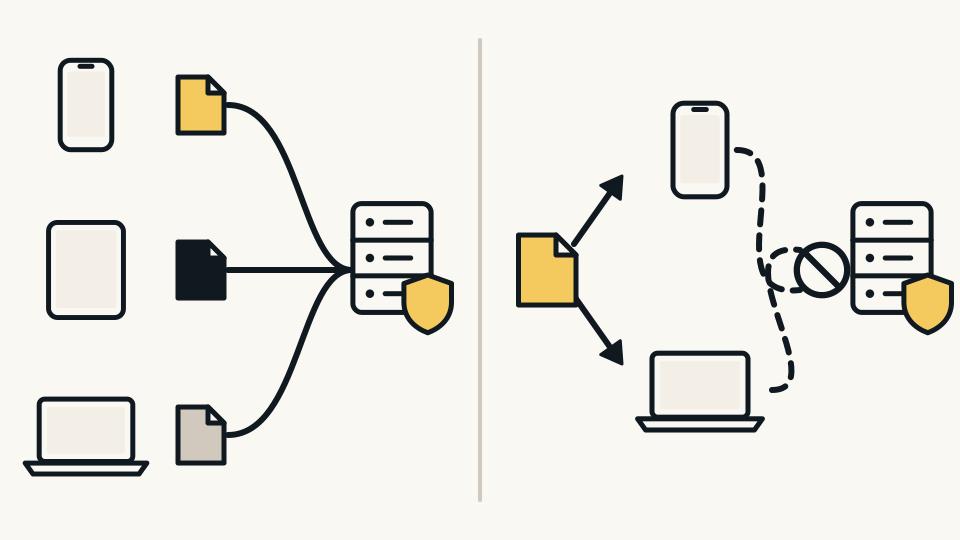
| Repeated disconnections | Check whether the same file is used on two devices at once. Create one file per device. |
| Printer, network drive or AirPlay unreachable | All traffic goes through the tunnel: in WireGuard, turn on “Exclude private IPs”. |
| Drop during a phone call | Some mobile networks suspend data during a call: the VPN resumes by itself afterwards. |
Sources and references
- Apple — Show or hide filename extensions on Mac (opens an external website)
- Apple — If you can’t change the time or time zone on your Apple device (opens an external website)
- WireGuard — Known limitations (opens an external website)
- Tunnelblick — Release notes (opens an external website)
- OpenVPN — iOS frequently asked questions (opens an external website)
Protect your file
- Your file is your personal access to FuzeVPN: it contains your private key, created in your browser and never sent to FuzeVPN. FuzeVPN keeps neither the file nor its key, and keeps no log of your activity.
- Transfer it only between your own devices or those of members of your household, your partner and your family: creation directly on the device, AirDrop, iCloud Drive or cable. Never by email, messaging app or forum, nor to FuzeVPN support.
- iCloud Drive, where Safari stores its downloads on iPhone, is encrypted, but Apple keeps the encryption keys, unless you have turned on Advanced Data Protection. After the import, delete the file, remove it from “Recently Deleted” in the Files app too, and empty the Trash on a Mac: a file deleted from iCloud Drive can otherwise be recovered for 30 days.
- Once imported, the WireGuard configuration is kept in the keychain, and showing its private keys requires you to authenticate. “Export zip archive” on iPhone, or “Export tunnels to zip…” on Mac, gathers all your private keys: never share this archive.
- Tunnelblick protects its configurations: changing them requires an administrator password.
- Give a file only to members of your household, your partner and your family, even if they live elsewhere, even abroad; use one file per device: each takes up one of your 5 device places.
- Device lost or file shared by mistake: delete its configuration in the Devices section to revoke its access and free its device place, or regenerate the file.